Showing posts with label DIY. Show all posts

Monday, February 13, 2012

A Lesson in Self-Care

(Now featured in Yahoo!Voices)

One of the things I will always remember when I first started therapy related to my separation/divorce, was multiple therapists telling me I needed to learn how to take care of myself.  I needed to practice "self-care".  At the time I laughed (internally) because I would NEVER allow myself to be so self-centered that I would just go and "take care of myself" for no good reason (the "no good reason" part was my dysfunctional inner voice talking).  Actually, I was terrified that if I started even "practicing" this, within months I'd be a full-fledged, self-centered, jerk who ONLY cared about myself. 

Well I did start practicing, and despite the fact that I am still really and truly afraid of becoming self-absorbed (which when I stop to think about it is probably not likely to ever happen, even if I wanted it to),  I have finally learned that whole "give yourself oxygen first so you can stay alive to give it to your kids" mantra.  And on really bad days, I've learned to enjoy sucking on that oxygen a little.

Sunday was one of those "bad" days.  For a variety of reasons.  Some visitation connected, others home-repair-connected.  Today was worse.  Spent most of the day at the court house (sorry, no details here).

So, because it makes me happier, let's focus on how I took care of myself:

1.  When I was in Home Depot buying replacement toilet flappers . . . I also bought myself some gorgeous bright pink hydrangeas!  Yay! 
Pink Hydrangeas from Home Depot
*  I also managed (Sunday) to sneak in a long, hot soak in the tub, a deep conditioner treatment for my hair and a desperately needed deep tissue back massage - all either free or from a gift certificate - so no pain to the wallet.

2.  Today when I finally left the courthouse at 4:30 pm (having been there since 9am), with a raging headache and a nauseous feeling in my stomach, I took myself out to a nice dinner at the Blue Ridge Grill in Leesburg.  I had an awesome chicken piccata, and a sinfully delicious chocolate mousse cake for dessert.  (And I took enough of it home to feed the kids, so they had a special dinner and dessert too!)
Yes - it was as good as it looks!
Tonight, despite two pretty rotten days back-to-back, I'm actually feeling happy and relaxed.  So ladies (and gentlemen if there are any reading this) - if you don't practice self-care, learn to.  It is worth it's weight in gold.
Pin It

Out of the Kitchen and into the Bathroom

Fluidmaster 5 Minute Flush Valve Kit

My great and wonderful plans to fix my FREEZING refridgerator were sidetracked this weekend when both of my toilets got jealous of all the attention my kitchen's been getting decided to make a fuss.

Background story - two years ago I noticed a "drip, drip, drip" coming from one of my toilets.  When I turned the water off and checked the tank 2 hours later, I found it completely empty.  Which, in case you didn't get the connection, means it's dumping  5+ gallons of water every couple of hours.  If you live in Leesburg you know that this is an EXPENSIVE leak!  I'm talking $300/month expensive. 
I immediately checked all the other toilets which were also leaking, replaced all the flappers, and decided to continue to check the toilets every six months.  (If you don't currently do this, I recommend you do it RIGHT NOW - your tank can easily be leaking and you'd really never know unless you tested it out).

My basement toilet has been a pain in my side because I replaced the flapper 5 times and it would never stop leaking.  I finally gave up (I know - this is not like me) and just turned the water off and left a note on the tank reading, "Please turn the water on to flush, then turn off when you are done."  Since hardly anyone ever uses that toilet, it was an okay fix . . . except it's been gnawing at me.

So yesterday, when I checked the upstairs toilets and found them leaking again, I was . . . let's just say "angry."  It was my 8 hours without the kids, so of course I was happy to spend it in Home Depot and fixing my toilets. (sarcasm) 

But, whatever, it had to be done.

So here are my tips if you decide you need to do this.  

1.  Start by replacing the flapper only.  You can buy these for about $3.  Test afteraward by turning the water off and checking the tank in the morning.  If your tank is still full - you're good.  Check again in 6 months.  (Or whenever you feel neurotic like me).

NOTE:  If you are allergic to rubber like I am I recommend wearing (non-rubber) gloves.  Actually, even if you're not allergic I recommend wearing gloves.  This is yucky.

2.  If after replacing the flapper, your tank is still leaking, get the 5 Minute Fix.  Costs about $7

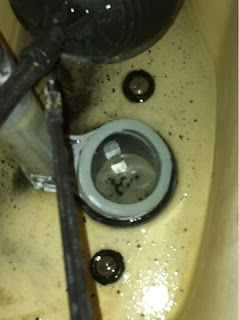
3.  Instructions say to empty the tank and dry it out with a hair dryer.  WHAT???  Even after letting all the water out, there was still about 2" of water in the bottom that would not go down on it's own.  I had to sop it up with a TON of toilet paper (don't flush this all at once after you get your flapper fixed or you'll have other issues).  But I suppose you could use towels if you're not grossed out by washing towels that have been soaked in toilet tank water.

NOTE:  The black rubber sealers around the screws in the tank will VERY likely be in some state of "rot" meaning the instant you touch them with ANYTHING they will leak out pitch blank inky water (much like a squid) that will pretty much stain anything.  So don't do this while wearing church clothes like I did. 

4.  DO make sure that you use the hair dryer to THOROUGHLY dry out the plastic flapper hole after you've gotten the water out of the tank.  The instructions remind you of this too, but it is important because if there's any water there, the seal puddy will not stick and you'll have wasted all your time and have to start over (THANK HEAVEN I trusted the intsructions on this one)

NOTE:  You can see from my pictures that there was still a bit of water left in the tank.  I was okay with that because it wasn't anywhere near the level of where I was attaching the puddy ring.  That part was totally dry.

Sealant Puddy (included with kit)
5.  Press on the puddy ring lightly.  Press on the new gasket and flapper and press firmly.
NOTE:  mine was on an angle - there are instructions on how to line up the hinge of the flapper - make sure you follow them.

New Gasket and Flapper Installed
6.  Wait just a minute or two, then turn your water back on and test the sucker out.  It should work for you. 

Good luck!

And you'll just have to stay tuned for my refridgerator repairs - I'll save that for next week.
Pin It

Thursday, February 9, 2012

Refrigerator Wars - Part I

That's right people. Never a dull moment in this house.

Refrigerator is now broken. Freezing Everything. Clearly it could be worse. But one more appliance I have to repair. :(.

Stay tuned for blogging updates.
Pin It

Wednesday, January 25, 2012

Dishwasher Wars - Part "Oh Hell Yah!"


I did it!!!!

The part came in today.  The entire replacement process took about 15 minutes.

My dishwasher officially drains perfectly now.

This week's lesson: Don't ever give up!


This is the bad part


This is the good part

Pin It

Monday, January 23, 2012

Dishwasher Wars - Part II

So last night, after the fourth time of pulling the dishwasher out, flipping the circuit breaker, pulling everything apart in the back, putting it all back together and running a test cycle, and it STILL leaving water behind in the tub, I finally decided to give up for the time being and feed my kids.

Thankfully, I had started this project early enough that it was only 6pm (although it honestly felt like 10pm at that point).  I’d made Corned Beef and Cabbage in the Crockpot that day (yay for Sunday traditions!) so it was an easy dinner.  Quick to put out, the kids love it so they ate everything, and even brought their dishes to the overflowing kitchen sink (I think they just wanted to get close to the “monster” that had been occupying Mommy for the past two hours).  To top it all off, they went to bed very nicely for me.  Thank God for small miracles. 
By 7:30pm I was back downstairs (finally changed out of my church clothes into some jeans and a sweatshirt) and back under the dishwasher -once again pulled out and power shut off.
Here’s where I need to make four points:
1.        Thank you to my Dad for having me right beside him for every repair he ever did to the house, the car, the tv, . . . Had it not been for that early training and watching, I would never have had the courage to pull the dishwasher out and even ATTEMPT to fix it.
2.       Thank you to Barry, who stayed on the phone with me all the way from Ireland (at close to midnight his time) while I described what was going on and what I was trying to do, tried to evaluate the pictures I was sending him via text, then even Skyped to try to get a better look at it and give me some advice.  While it was impossible for him to TOTALLY help half way across the world, he was there for moral support (and reminding me to turn off the breaker to the electric before I started pulling at the wet wires).
3.       Yes, my butt crack was hanging out of my jeans while I was bent over and under and behind the damnable machine.  I guess we can’t totally blame those overweight plumbers for the peep show.  At different points, all three kids came around the corner and yelled at me to pull up my pants!
4.       I’m glad my kids got to see me working through this problem.  Despite the fact that I yelled at them a few times to “go away from the kitchen and play in the playroom!” they saw their mom working to fix a problem.  For the most part, I kept my cool.  I think that’s a good thing for kids to see their mom doing.

So . . . after making two more attempts at fixing things, slicing my thumb open and bleeding all over the floor, I finally put it all back together and told myself that was it.  I’d tried my best.  I’ll have to probably call a repairman.  But I have to tell you, I am not satisfied with this answer.  I NEED to fix this!  So later that night I googled some more and came up with this:

I am 99.99% sure that this is my problem.  Because at one point I had that little bugger of a piston out of the machine and it looked totally messed up.  But I just shoved the rubber gasket back down in it and put it all back together.  That obviously wasn’t the solution – but REPLACING it probably will be.  So for $15 I am going to give it a shot! 
Keep your fingers crossed!  I want this to work!!!

AP2617344 Dishwasher Piston & Nut Check Valve
Pin It